Table of Contents
📋 Summary
Using SSO to authenticate can make logging into Whistic faster. It's also more secure which would make any Security team happy. This article goes over how to set up SSO with Whistic using Google as your IDP.
- Review our main SSO guide HERE.
- This guide covers things that are unique to Google SSO.
⚙️ Basic Setup
Create Custom App
-
Go to Google Administration > Apps > Web and Mobile Apps
- Create a custom app and add app name and image
-
Click Download Metadata
-
Click Continue to go to SSO configuration settings
SP Entity ID: https://auth.whistic.com/auth/realms/COMPANYWEBSITE
ACS / SSO URL: https://auth.whistic.com/auth/realms/COMPANYWEBSITE/broker/saml/endpointLogin Bookmark: https://COMPANYWEBSITE.whistic.com/v2/console/dashboard
SAML Attribute Mapping
The standard Whistic attributes that should be mapped are
- Primary Email (Required): emailAddress
- First Name: firstName
- Last Name: lastName
-
Title: title
☁️ Upload Metadata to Whistic
Once you have obtained the metadata and identified your role source, you are ready to proceed to the next steps below!
- Click Settings then Company Settings, this will drop you into the General tab of Company Settings.
- Scroll down to the second section and locate Single Sign-On Settings.
-
Open your metadata file, copy everything in the file and paste it in the open box, then select your role source (Whistic or IDP)
Note: Please note: Setting the role source to IDP prior to setting up roles in the IDP can cause users to be locked out of Whistic. We have linked our Roles/Permission guide (SSO Roles and Value Guide) directly above for ease, as you may need to reference this guide when setting up user permissions. See message below: - Click Submit!
🔐 Setup for IDP controlled Roles
Attribute Mapping For IDP Controlled Roles
If your company is going to use IDP-controlled roles you will need to create a custom attribute for each role that will be used. Available Whistic roles can be found here.
If only 1 role will be used you can apply a group attribute. The group name must match our roles exactly (for example: WhisticAdmin).
Creating Custom Attributes
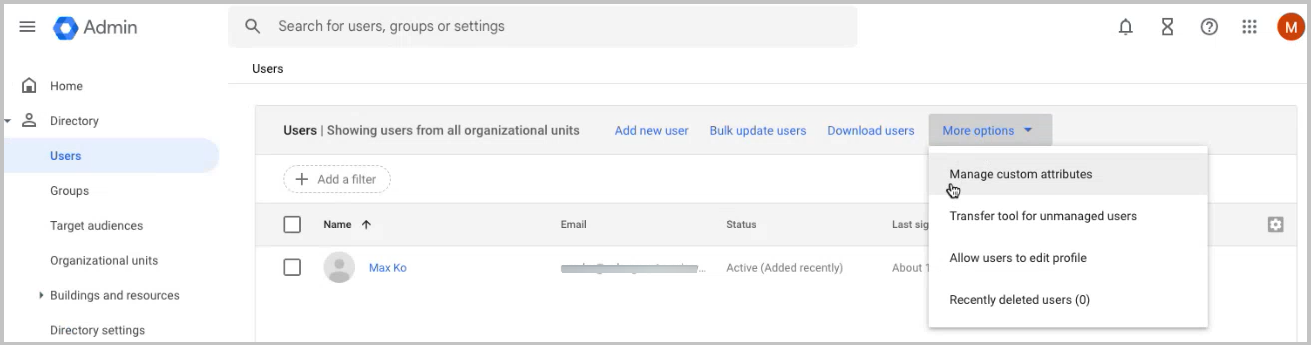
- From Google Admin go to the Directory
- Go to the root directory of the Organization
- More Options > Manage Custom Attributes
-
Add Custom Attribute (Will need to repeat for each role attribute that will be passed)
Custom fields:- Name: Best practice is to match the specific role as listed here. This will avoid confusion when mapping these values to the Whistic values.
- Info Type: Text
- Visibility: Visible to organization
- No. of values: Single value
- After the attributes have been created, locate your user and add the role to the user:
User > (user) > User Information (top) > (attribute)- Once again it is recommended that you match role text to the specific role that will be passed to Whistic.
- If a specific user does not need a particular role, leave the value for that attribute blank.
- Users can be edited in bulk in the Directory view: Users > (all or selection) > Bulk update users > (csv functionality)
Mapping Custom Attributes
- From Google Admin go to Apps > Web and mobile apps
- Whistic App (Custom app created previously) > Attribute Mapping
- Add Mapping
- Scroll until you find the new custom attribute that was created
- The App Attribute must match the value that is found here.
- Create individual mapping for each attribute.
Turning On IDP-Controlled Roles In Whistic
Once the setup above is complete reach out to your CSM and/or Whistic support to enable the authentication for your company.
👤 Add New User
Whistic Controlled Roles
When you are looking to create a new user and SSO is set to required, please ensure the following has been configured:
- User has been provisioned
- Default Roles are set up (Sign-Up Approval Modes)
Once these two items are in place, the new user will simply go to your bookmark link (companyName.whistic.com) and once authenticated, the user's account will be created. Should the user's permissions need to be updated, please have a Whistic admin update their permissions from User Management.
IDP Controlled Roles
For adding a new user when SSO is set to required, please ensure the following has been configured:
- User has been provisioned
- Default Roles/Groups are set up using our SSO attribute values
- Role attribute values can be found here and must match exactly (case-sensitive). The group name must also match the role attribute or the permissions will not be passed to Whistic.
Once these two items are in place, the new user will simply go to your bookmark link (companyName.whistic.com) and once authenticated, the user's account will be created. Should the user's permissions need to be updated, please have an SSO admin update their permissions from the IDP directly, as the user management page cannot be utilized when using IDP-controlled roles.
FAQ
Q: How do I set up the bookmark/login URL?
A: From what we've seen, Google does not have a good way to handle this. Your users will likely need to bookmark the link in their browser or in some other way.
Q: Can I assign attributes to users at the group or organization level?
A: You can assign 1 role to a specific group. After that, you will need to add all other roles via user-specific custom attributes. For more information about user approval methods and default roles click here.